Italy is known worldwide for its bread: fragrant, tasty, a magnificent balance of crunchiness and softness, it is the perfect companion to all dishes and the most essential ingredient of countless types of sandwiches.
We all know Italian bread comes in a variety of shapes: pagnotta, filone, filoncino. Sfilatino, rosetta and ciabatta.Miccone, treccia and micca tradizionale, all the way to grissini and rubatà. And these are only a handful of names and varieties you can find across the country, because — as it happens all the time in Italy — every region seems to have its own special recipes and types.
The profound culinary and cultural connection between the Bel Paese and bread shouldn’t surprise that much, if we consider that cereals — wheat and spelt especially — have been at the very heart of the Mediterranean diet for the good part of three millennia, along with the olive and the vine, parents of oil and wine and other two elements of the Mediterranean triad.
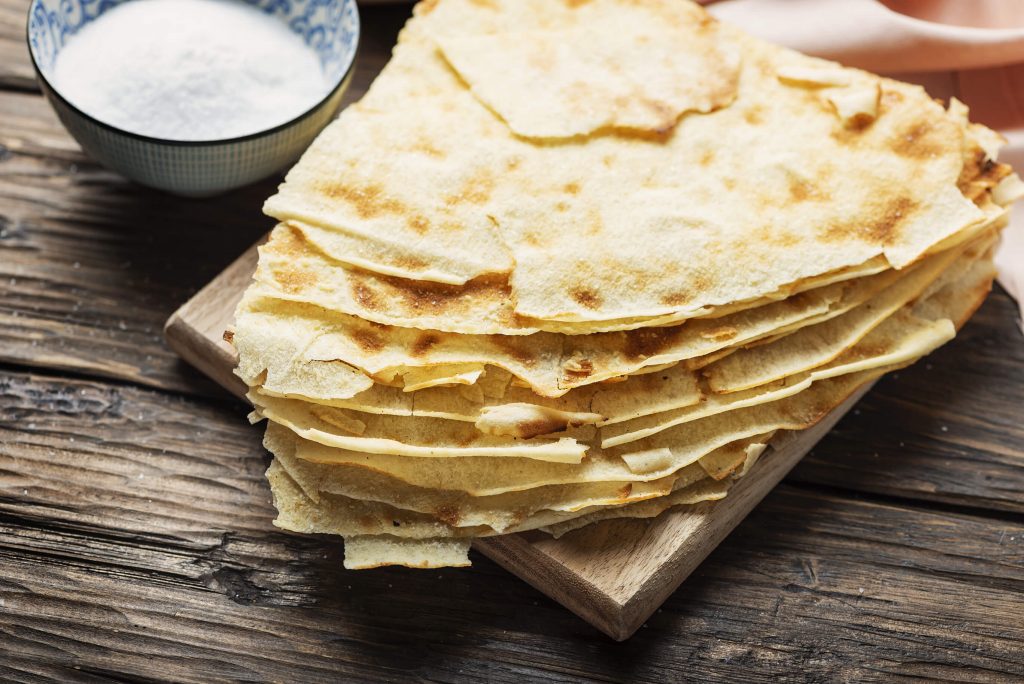
Pane guttiau is carasau with olive oil and salt. Photo: Oxana Denezhkina/Dreamstime
When we think about Italian bread, crunchy crust and soft, flavorsome crumb immediately come to mind, yet there is a bread, a child of mysterious, archaic, beautiful Sardinia, which is quite different from this stereotype: pane carasau.
Ingredient-wise, pane carasau doesn’t stray from the norm: water, salt, flour and yeast — even though, we will see, the original recipe was even simpler. A staple of Sardinian cuisine and part of the diet of the island’s shepherds for centuries, this crunchy and flavorsome specialty, also romantically known as carta musica, or music sheet, for how thin and crisp it is, has become pretty popular throughout the peninsula, so much so you can find it quite easily in all supermarket. Of course, I am not saying that chain store carasau is the best option, mind.
According to food historians, pane carasau comes from Barbagia, a wild, mountainous area at the heart of Sardinia, and it was first produced thousand and thousand of years ago, as attested by archaeological findings of cooking instruments and bread remnants dating back to the Bronze Age.
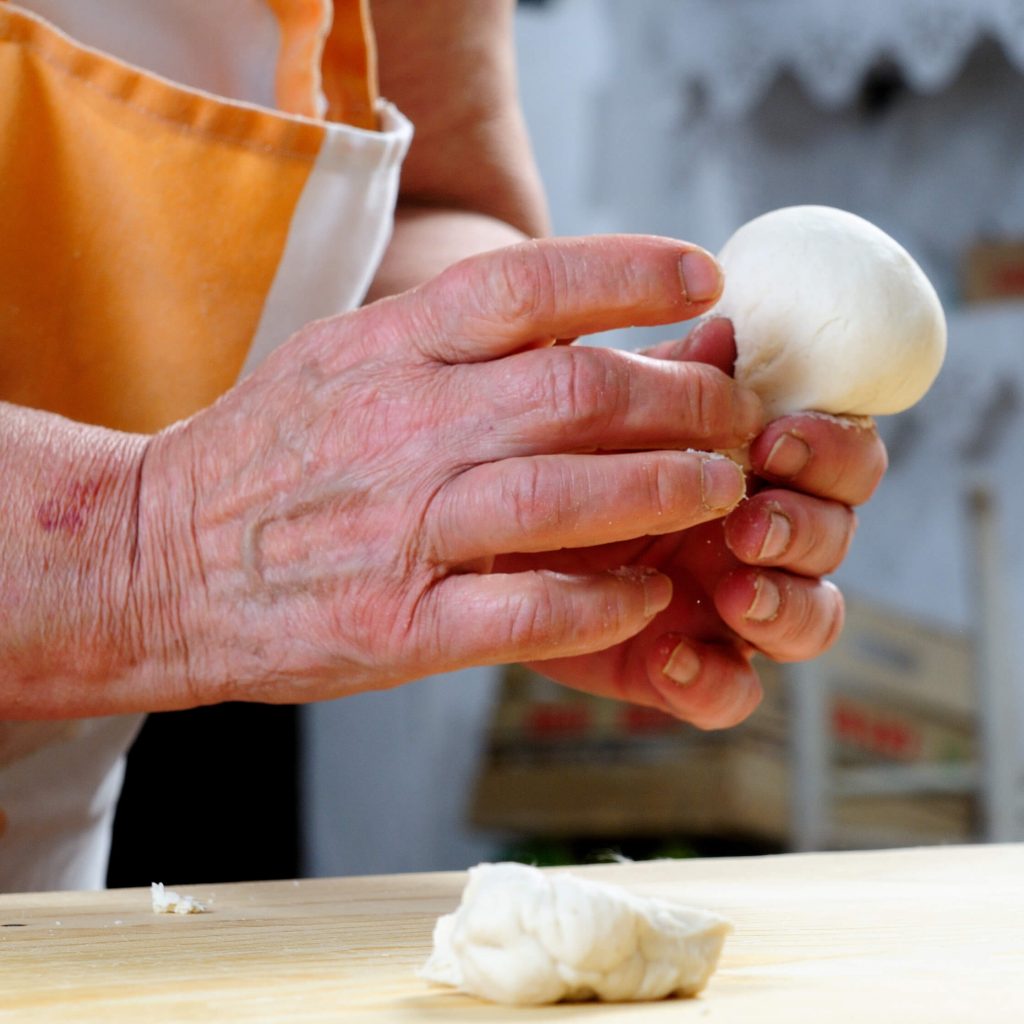
Preparing pane carasau is a true ritual. Photo: Francesco Mou/Dreamstime
Our carasau is considered one of the oldest types of bread in the world, also in name of the true simplicity of its ingredients, which originally were only two, water and flour. Because of its round shape, crispiness and lack of yeast, the “old” carasau has been widely compared to the bread made in ancient Mesopotamia and in the Middle East. Indeed, it is very close to the bread we associate with the times of Jesus Christ and typical of Israel, unleavened bread.
Historically, carasau is the bread of shepherds. Just like so many other quintessential staples of our cuisine, like pesto, pasta cacio e pepe and even Puglia’s burrata, it became common because of how well it kept in time: regularly forced to spend long periods of the year away from home to tend to their sheep, Sardinian shepherds needed a bread able to last without spoiling: with its simple combination of water and wheat (or sometimes barley, which was cheaper) flour, and thin crispy texture, carasau could last for weeks and weeks without molding nor getting stale. It was usually consumed with ricotta or other cheeses, which were layered on top of it, as if it were a plate. In time, pane carasau became common in all families and was often used as currency in rural exchange economy.
Its preparation truly was a ritual which even today, if you really want to make it the right way, you should follow. Called sa cotta, it involved always three women either related or connected through community ties (friends or neighbors, for instance), who would help one another in the preparation and often paid the favor back with cheese or olive oil. Sa cotta would start at sunrise, when the women would mix water and flour together to make a dough, which they would then knead patiently until it became firm and smooth. Then, the dough was left to rest for a few hours inside special terra-cotta containers, then cut into round, regular pieces, which were flattened with a rolling pin until they reached a diameter of about 40 cm (16 in) and only 2 to 3 mm in thickness (0.08 in). The disks were then baked in a stone oven at extremely high temperature (between 800 and 900 F), which caused them to puff up. The women would then take them out of the oven and separate the two thin, puffed up layers with a pairing knife, obtaining two crunchy bread sheets. All the sheets were then piled one upon the other, divided by linen sheets until they were completely cool.
Once cold, the carasatura process, which gives this bread its name, began. The bread sheets were baked a second time to obtain their typical golden color and crisp texture. In time, salt and yeast were added to the old, traditional recipe: this meant the dough had to rest for more hours before being rolled out and baked.
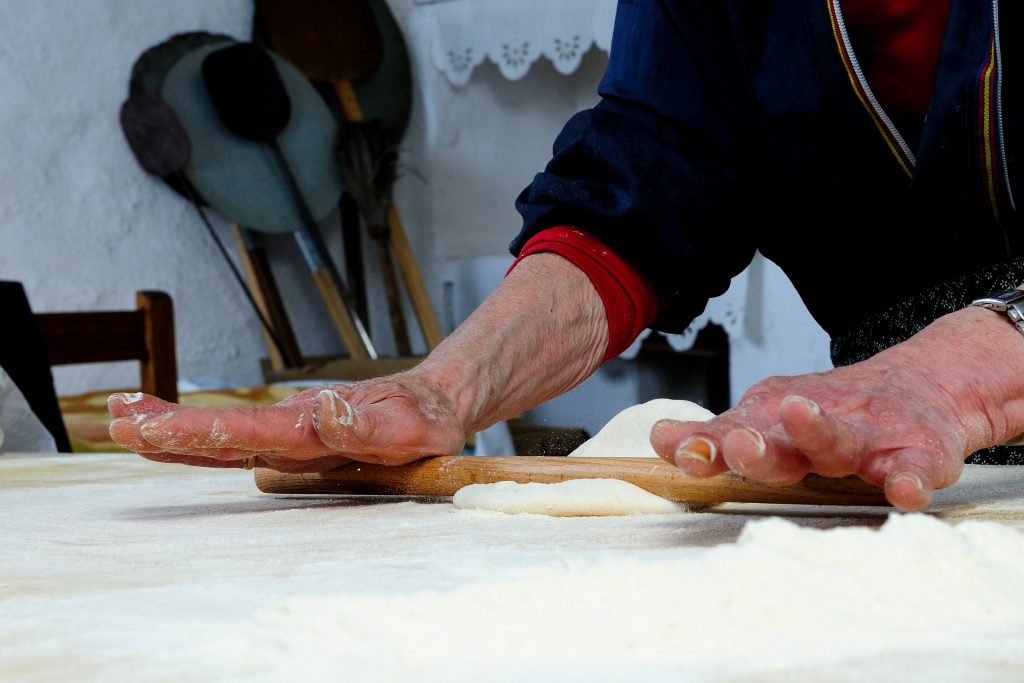
The dough for a perfect pane carasau must be rolled very thin. Photo: Francesco Mou/Dreamstime
Pane carasau is a very versatile ingredient: you can have it just as it is and enjoy its incredible texture, or make pane frattau and pane guttiau with it. For pane frattau, just quickly wet the bread in some boiling water or broth, then dress it with tomato sauce, a fried egg and some grated cheese. If pane guttiau strikes better your fancy, then only add some drops of olive oil and a pinch of salt, stick it in the oven for a couple of minutes, and voilà.
If you want to have it with deli meats or cheeses, you can quickly wet it with some water or broth (it shouldn’t absorb too much liquid, so be careful!) and go ahead with your feast: wetting it makes it soft enough to be rolled around whatever you want to have it with.
Now, let’s make it!
Traditional recipe (without yeast)
1 kg (2 lbs) of durum wheat flour
Water enough to make a firm and smooth dough with the amount of flour above.
Mix together the ingredients and knead until you obtain a smooth dough. Divide it in smaller sections and roll it into a round, very thin (not more than 2 or 3 mm, or 0.08 in) circle. Let the dough disks rest for a couple of hours, making sure you cover them with a woolen cloth.
Cook them one by one for a handful of seconds at the highest temperature your oven can reach, until they puff up. Take them out of the oven, divide the base sheet of the disk from the puffed up sheet, let them all cool, then bake them again for a couple of minutes in the oven to make them nice and crunchy.
Recipe with yeast (as proposed by La Cucina Italiana)
500 gr (1 lbs) of durum wheat flour
300 ml of water
a pinch of salt
5 gr (0.18 oz) of yeast
– Turn on the oven and pre-heat it at 220C or 430F, leaving a large baking tray in it to heat up.
Mix the yeast in a little water and add to the flour. Start mixing, then add the salt and gradually the rest of the water until you obtain a smooth and firm dough, which you will then knead for about 10 minutes.
Divide the dough into 16 balls and let them rise, covered, for about 3 hours, or until their volume doubles.
Then, roll each of them out with a rolling pin (don’t forget to flour the table, lest the dough sticks to it), making them thin.
Once you turned all the balls into disks, take two and put them one upon the other, then roll them out again.
Place the disks (one by one) on the heated baking tray (use an oven mitt when handling it) and bake them for not more than 15-20 seconds, until they puff up.
With a knife, divide the two parts of the puffed up sheet, as explained in the previous recipe, then place the sheets in the oven again and bake for about 8 minutes at 170C or 340F.
Let them cool and enjoy!
PS: according to the people at La Cucina Italiana (and they know a thing or two about cooking, let me tell you), heating up the baking tray before placing the disks on it is essential, so don’t bypass this step.
L’Italia è conosciuta in tutto il mondo per il suo pane: fragrante, gustoso, un magnifico equilibrio di croccantezza e morbidezza, è il compagno perfetto di tutti i piatti e l’ingrediente essenziale di innumerevoli tipi di panini.
Tutti sappiamo che il pane italiano è disponibile in diverse forme: pagnotta, filone, filoncino. Sfilatino, rosetta e ciabatta. Miccone, treccia e micca tradizionale, fino ai grissini e ai rubatà. E sono solo una manciata di nomi e varietà che si possono trovare in tutto il Paese, perché – come accade sempre in Italia – ogni regione sembra avere le proprie ricette e tipologie speciali.
Il profondo legame culinario e culturale tra il Bel Paese e il pane non dovrebbe sorprendere più di tanto, se si considera che i cereali – grano e farro in particolare – sono stati al centro della dieta mediterranea per buona parte di tre millenni, insieme all’olivo e alla vite, genitori dell’olio e del vino, altri due elementi della triade mediterranea.
Quando pensiamo al pane italiano, ci viene subito in mente la crosta croccante e la mollica morbida e saporita, eppure c’è un pane, figlio della misteriosa, arcaica, bella Sardegna, che è ben diverso da questo stereotipo: il pane carasau.
Per quanto riguarda gli ingredienti, il pane carasau non si discosta dalla norma: acqua, sale, farina e lievito – anche se, vedremo, la ricetta originale era ancora più semplice. Da secoli alimento base della cucina sarda e parte della dieta dei pastori dell’isola, questa croccante e saporita specialità, romanticamente conosciuta anche come carta musica, per quanto è sottile e croccante, è diventata piuttosto popolare in tutta la penisola, tanto che la si può trovare facilmente in tutti i supermercati. Naturalmente, non sto dicendo che la catena di negozi carasau sia l’opzione migliore.
Secondo gli storici dell’alimentazione, il pane carasau proviene dalla Barbagia, una zona selvaggia e montuosa nel cuore della Sardegna, ed è stato prodotto per la prima volta migliaia e migliaia di anni fa, come attestano ritrovamenti archeologici di strumenti di cottura e resti di pane risalenti all’Età del bronzo.
Il nostro carasau è considerato uno dei più antichi tipi di pane del mondo, anche in nome dell’assoluta semplicità dei suoi ingredienti, che in origine erano solo due, acqua e farina. Per la sua forma rotonda, la croccantezza e la mancanza di lievito, il “vecchio” carasau è stato ampiamente paragonato al pane prodotto nell’antica Mesopotamia e in Medio Oriente. Infatti, è molto vicino al pane che associamo ai tempi di Gesù Cristo e al pane azzimo tipico di Israele.
Storicamente, il carasau è il pane dei pastori. Come tante altre icone della nostra cucina, come il pesto, la pasta cacio e pepe e persino la burrata pugliese, è diventato comune per la sua buona conservazione nel tempo: regolarmente costretti a trascorrere lunghi periodi dell’anno fuori casa per accudire le pecore, i pastori sardi avevano bisogno di un pane capace di durare senza rovinarsi: con la sua semplice combinazione di acqua e farina di grano (o a volte d’orzo, che era più economica) e la sua consistenza sottile e croccante, il carasau poteva durare per settimane e settimane senza ammuffire né diventare raffermo. Di solito veniva consumato con ricotta o altri formaggi, che venivano messi a strati sopra di esso, come se fosse un piatto. Col tempo, il pane carasau è diventato comune in tutte le famiglie ed è stato spesso usato come moneta di scambio nell’economia rurale.
La sua preparazione era davvero un rituale che ancora oggi, se si vuole davvero farlo nel modo giusto, bisogna seguire. Chiamato sa cotta, coinvolgeva sempre tre donne imparentate o legate da vincoli di comunità (amiche o vicine di casa, per esempio), che si aiutavano a vicenda nella preparazione e che spesso ripagavano il favore con formaggio o olio d’oliva. Sacotta iniziava all’alba, quando le donne mescolavano acqua e farina per fare un impasto, che poi impastavano pazientemente fino a quando diventava solido e liscio. Poi la pasta veniva lasciata riposare per qualche ora all’interno di appositi contenitori di terracotta, quindi veniva tagliata in pezzi rotondi e regolari, che venivano appiattiti con il mattarello fino a raggiungere un diametro di circa 40 cm (16 in) e solo 2 o 3 mm di spessore (0,08 in). I dischi venivano poi cotti in un forno di pietra ad altissima temperatura (tra 800 e 900 F), che li faceva gonfiare. Le donne li tiravano fuori dal forno e separavano i due sottili strati gonfiati con un coltello a serramanico, ottenendo due croccanti sfoglie di pane. Tutti i fogli venivano poi accatastati uno sull’altro, separati da teli di lino fino a quando non erano completamente freddi.
Una volta freddi, iniziava il processo di carasatura, che dà il nome a questo pane. Le sfoglie di pane venivano cotte una seconda volta per ottenere il tipico colore dorato e la consistenza croccante. Col tempo si aggiunsero sale e lievito all’antica ricetta tradizionale: questo significò che l’impasto doveva riposare per più ore prima di essere steso e cotto.
Il pane carasau è un ingrediente molto versatile: si mangia così com’è godendosi la sua incredibile consistenza, oppure con esso si possono fare il pane frattau e il pane guttiau. Per il pane frattau, basta bagnare velocemente il pane in acqua bollente o brodo, poi condirlo con salsa di pomodoro, un uovo fritto e del formaggio grattugiato. Se il pane guttiau incontra di più la vostra fantasia, aggiungete solo qualche goccia d’olio d’oliva e un pizzico di sale, poi mettetelo in forno per un paio di minuti e voilà.
Se volete mangiarlo con salumi o formaggi, potete bagnarlo velocemente con un po’ d’acqua o di brodo (non deve assorbire troppo liquido, quindi fate attenzione!) e procedete con la vostra abbuffata: bagnarlo lo rende abbastanza morbido da poter essere arrotolato intorno a qualsiasi cosa vogliate mangiarlo.
Ora, facciamolo!
Ricetta tradizionale (senza lievito)
– 1 kg di farina di grano duro
– Acqua sufficiente per ottenere un impasto sodo e liscio con la quantità di farina di cui sopra.
– Mescolate gli ingredienti e impastate fino ad ottenere un impasto omogeneo. Dividetelo in sezioni più piccole e arrotolatelo in un cerchio tondo, molto sottile (non più di 2 o 3 mm, o 0,08 in). Lasciate riposare i dischi di pasta per un paio d’ore, facendo attenzione a coprirli con un panno di lana.
– Cuoceteli uno ad uno per una manciata di secondi alla temperatura massima che il vostro forno può raggiungere, fino a quando non si gonfiano. Toglieteli dal forno, dividete la sfoglia di base del disco dalla sfoglia gonfiata, lasciate raffreddare, poi infornateli di nuovo per un paio di minuti per renderli belli croccanti.
Ricetta con il lievito (come proposto da La Cucina Italiana)
– 500 gr di farina di grano duro
– 300 ml di acqua
– un pizzico di sale
– 5 gr di lievito
– Accendere il forno e preriscaldatelo a 220C o 430F, lasciandoci dentro una grande teglia a riscaldare.
– Impastate il lievito in un po’ d’acqua e aggiungetelo alla farina. Iniziate a mescolare, poi aggiungete il sale e gradualmente il resto dell’acqua fino ad ottenere una pasta liscia e soda, che impasterete per circa 10 minuti.
– Dividete l’impasto in 16 palline e lasciatele lievitare, coperte, per circa 3 ore, o fino a quando il loro volume raddoppierà.
– Poi, stendete ognuna di esse con un mattarello (non dimenticate di infarinare la tavola, per evitare che l’impasto vi si attacchi), facendole diventare sottili.
– Una volta trasformate tutte le palline in dischi, prendetene due e metteteli uno sull’altro, poi stendeteli di nuovo.
– Mettete i dischi (uno ad uno) sulla teglia riscaldata (usate un guanto da forno quando la maneggiate) e cuocete in forno per non più di 15-20 secondi, fino a quando non si gonfiano.
– Con un coltello, dividete le due parti del foglio gonfiato, come spiegato nella ricetta precedente, poi mettete di nuovo i fogli nel forno e cuocete per circa 8 minuti a 170C o 340F.
– Lasciatele raffreddare e buon appetito!
PS: secondo La Cucina Italiana (e loro ne sanno qualcosa di cucina, lasciatevelo dire), è indispensabile riscaldare la teglia prima di metterci sopra i dischi, quindi non tralasciate questo passaggio.
Unlike many news organizations, instead of putting up a paywall we have eliminated it – we want to keep our coverage of all things Italian as open as we can for anyone to read and most importantly share our love with you about the Bel Paese. Every contribution we receive from readers like you, big or small, goes directly into funding our mission.
If you’re able to, please support L’Italo Americano today from as little as $1.


")
")


")


")


